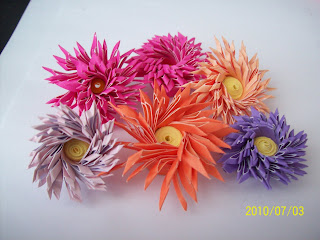
I posted this pic of some quilled flowers awhile ago, and just recently posted it to a facebook quilling group. Well there were a lot of questions on how I made them. Well if you look at the date on the bottom of the pic, it is almost a year ago that I made those, I can't remember where I seen them. So I could not direct anyone to a certain site so I decided to try doing my own tutorial. Hope this helps ladies.
I started with a 2 inch piece of scrap cardstock, any length (depends on the size you want the flower)Folded the strip of paper in half. I also used a bone folder to make the fold crisp.
Glue ONLY the edge. I then press the edges together.
The using my scissors ( or use a fringer if you have one, I don't have one) I start cutting fringes on an angle, and try to be as even as possible, make sure you leave an edge, and try to make it even the whole length of the paper.
At the end when the is no more room at the top to make a fringe I just cut out a little triangle.
Glue another strip of card stock any color (for the middle of the flower) onto the end where you started, not the little tail. Try and make the middle strip the same width as the flower bottom.
Just roll from the middle out and I add glue along the way. And you should end up with something like this^^^^^^^^^.
Spread out your fringes and your done.
I hope this helps and it is clear enough.
So did I do ok for my 1st tutorial???
Hope everyone have an awesome July 4th weekend, and to my Canadian friends, hope you had a great Canada Day yesterday.
Hugs,
Melissa D


3 comments:
Your tutorial was really good! I'll have to try this again. I've tried a couple times before but mind didn't look as good as yours. Great job!!
WOW, that looks so easy compared to the flowers. They look fantastic...TFS and i'm going to try one today...www.justwordz.ca
Cute!! Great job on the tutorial :).
Post a Comment