Saturday, July 30, 2011

I am beat, but it is going to be worth it.....

 Well here it is, My craft room, the second pic with the desk.. well that is where I am sitting right now. :) I have most of my craft stuff brought down now. :) And even have some put away. I need another table or two, and some shelves, but it will all get there in time. But this is going to be my oasis. :)
Hope your weekend is going good. Mine is, tiring, but good. :)

Hugs,
Melissa D

Friday, July 29, 2011

moving day....

It's finished!!!!!! No I am not moving house, but I am moving into my craft room. :) I am so excited it is finally finished. I am not trying to box everything up to move it all down stairs to MY craft room, I have a room!! My very own room. Here is what it looks like, the walls look pinker then I would like, but it was suppose to be a purple lilac color. A few little details have been done since these pics, but you get the idea.
It is all cleaned up now, and no more dirty saws, or work tables. I have my new craft table in there already, just need to pack my supplies up and get it all down there. In the pics the walls look really pink, but they are not that pink in RL.
What do you think?? Any suggestions where I should place things?? I think a pantry/closet is going in the corner of the first pic, and my computer desk next to it, I was going to put it on the back wall in the second pic, but I hate the thought of having my back to the door, because if I am making something I won't notice anyone coming in. I can zone out completely sometimes. :)
Well back to the packing. Have a great weekend everyone.
Hugs,
Melissa D

Wednesday, July 13, 2011

It's getting closer


Messy I know but it is progress, this was the 9th, and all the walls are boarded up now,  and the ceiling is closed in, I have to go down and take a few more pictures. A lot has gotten done last week while the boyfriend was off. It's hard for him to do much in the evenings because of his back problems so must of it was done by my dad.
I am so excited I can't wait.
And my expression did come on Monday, I haven't had a chance to play with it yet, but it is out of the box. I just have no where to put it yet.
Well I am having a hard time keeping up with my blog reading lately, blogger is still acting up for me and it is so annoying. And being summer it is harder to find the time to read.
Have a great rest of the week.
Hugs,
Melissa D


Friday, July 8, 2011

Can't wait till Monday....

I am sure you don't here those words very often. But I just tracked my expression and it is in the capital city, so I don't think mail comes on Saturdays so I am hoping it will be here on Monday!! Cross your fingers for me to get it by Monday at least if not sooner. :)
I hope this even post, blogger is having a lot of problems in the last few months it seems, I haven't done a blog hop in sooooo long because I can't comment on most blogs, it is very frustrating.
Well better go and check to see how much my son's pool is filled up. Hope everyone is having a great summer.
P.S. I will have an update on my craftroom soon, the BF has been off this week so he is helping my dad with it, and the wall is up at least now. Pics to come soon. :)
Hugs,
Melissa D

Saturday, July 2, 2011

My 1st photo Tutorial

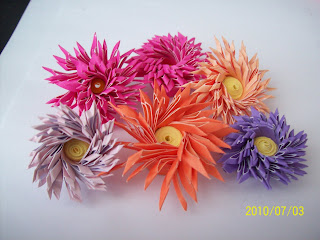
 I posted this pic of some quilled flowers awhile ago, and just recently posted it to a facebook quilling group. Well there were a lot of questions on how I made them. Well if you look at the date on the bottom of the pic, it is almost a year ago that I made those, I can't remember where I seen them. So I could not direct anyone to a certain site so I decided to try doing my own tutorial. Hope this helps ladies.
 I started with a 2 inch piece of scrap cardstock, any length (depends on the size you want the flower)
 Folded the strip of paper in half. I also used a bone folder to make the fold crisp.
 Glue ONLY the edge. I then press the edges together.
 The using my scissors ( or use a fringer if you have one, I don't have one) I start cutting fringes on an angle, and try to be as even as possible, make sure you leave an edge, and try to make it even the whole length of the paper.
 At the end when the is no more room at the top to make a fringe I just cut out a little triangle.
 Glue another strip of card stock any color (for the middle of the flower) onto the end where you started, not the little tail. Try and make the middle strip the same width as the flower bottom.
 Just roll from the middle out and I add glue along the way. And you should end up with something like this^^^^^^^^^.
Spread out your fringes and your done.
I hope this helps and it is clear enough.
So did I do ok for my 1st tutorial???
Hope everyone have an awesome July 4th weekend, and to my Canadian friends, hope you had a great Canada Day yesterday.
Hugs,
Melissa D